


[:hu]Galambos Fecó bűvésziskolája:
 |
Fogadjunk!
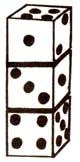
Tegyél egy pénzérmét az asztalra, készíts rá három egymásra tett dobókockából egy tornyot és mondd el a nézőknek, mi a feladat. Ki kell venni a pénzt a kockák alól anélkül, hogy a kockákhoz nyúlnának, vagy a torony ledőlne. Nyugodtan fogadhattok akár a kockák alá helyezett pénzben is, mert a nézőknek aligha fog sikerülni a dolog. Megoldás: vegyetek elő a zsebetekből egy másik pénzérmét is, melyet letesztek az asztalra, kb. 5-10 centiméterre a kockatoronytól. A kockák alatt lévő érmét megcélozva pöcköljétek meg és az érme kilövi a másikat anélkül, hogy a torony ledőlne. Ajánlatos a fogadás előtt egy-kétszer gyakorolni! |
|

| Kártyareptetés a kalapba
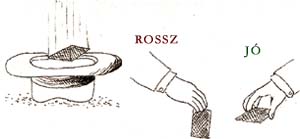
Helyezettek a padlóra egy kalapot, majd adjatok a társatok kezébe három bármilyen kártyalapot. A Feladat az, hogy ezeket a lapokat kb. 120 centiméter magasságból ejtse bele a kalapba! Legnagyobb meglepetésre egyetlen kártyalapot sem fog tudni beledobni. A legtöbben ugyanis a lapokat függõlegesen, vagyis az élével akarják majd beleejteni, holott a lapjával kell azokat elengedni. Próbáljátok ki és meglátjátok, remek szórakozást tudtok nyújtani vele társaitoknak. |
 |
 |
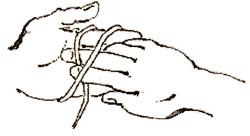 |
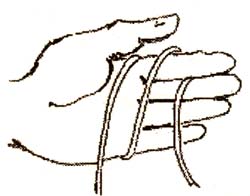
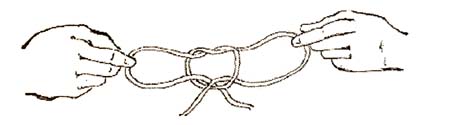
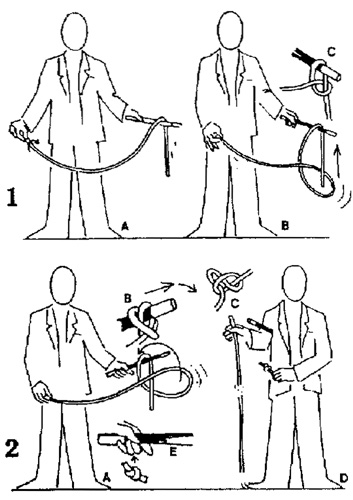
Az eltüntetett masni A fenti kötéltrükk több profi bűvész műsorában is szerepel. Mindenképpen egy zsinórral a kezetekben, a szöveget olvasva és a rajzot figyelve kezdjétek el gyakorolni. Tegyétek a zsinórt a felétek néző bal tenyeretekbe. A hátul lelógó szárat tekerjétek egyszer alulról előre át, és fogjátok meg a középső- és mutatóujjatokkal. Az ábrán látható külső csavar alatt nyúljatok át a jobb kéz középső és mutatóujjával, fogjátok meg a belső lelógó szárat és a két ujjatokat erősen szorítva húzzátok szét a két kezeteket. Ezután a jobbról jövő szárat a bal hurkon, a balról jövő szárat a jobb hurkon felülről húzzátok át. Ha ezután a zsinór szárait kétfelé széthúzzátok, a zsinór közepéről eltűnik a masni. |
 |
||
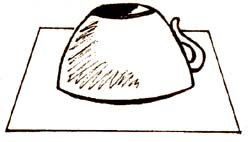
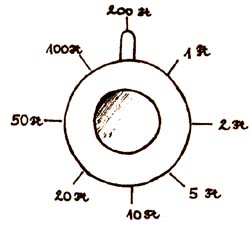
| Misztikus csészemutatvány | |
 |
 |
|
Készítsetek elő az asztalra egy-egy 1, 2, 5, 10, 20, 50, 100 és 200 Ft-os érmét. Ha nincs ennyi pénz nálatok, megteszi 8 különböző színű, vagy feliratú zseton is. A magyarázat: ebben a trükkben egy segítő is közreműködik. Az ábra pontosan mutatja, hogyan kell a segítőnek a csészét rátenni a választott pénzre. Így aztán amikor visszajöttök a szobába, már rögtön tudjátok a csésze fülének állásából, hogy milyen pénz van alatta. |
|
[:en]Magician’s School:
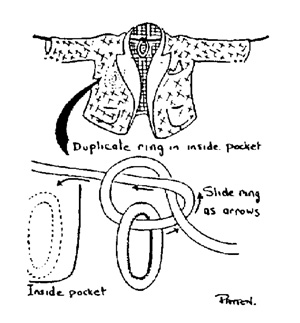
THE CEEBEE RING OF ROPE
EFFECT AND METHOD: The problem is to remove the ring magically, and here is the method:
Hand the rope for examination — the knot is still in the centre, whilst the original ring is snugly out of harms way in the jacket pocket |
|
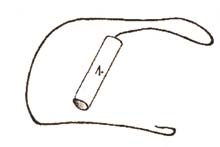
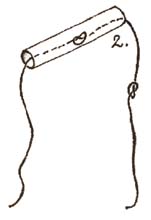
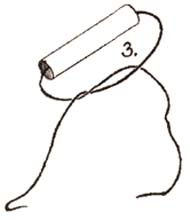
WAND-O-KNOT FLIP EFFECT: The end of a rope is held in the right hand. The other end rests on a magic wand held in the left hand. In a small movement of the right hand, the performer makes a knot in a manner which is both surprising and elegant – it’s a real knot which he unties. PRESENTATION: 1. THE REAL KNOT (fig.1 ) 2. THE FALSE KNOT (fig. 2) |
 |
| CHAIN ESCAPE | |
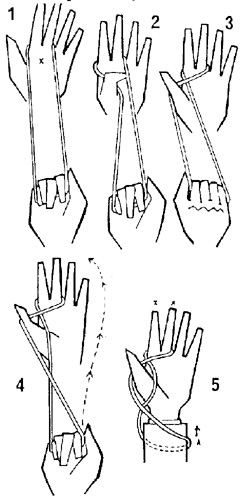 |
FOR THIS EFFECT an endless ball-chain is used, though the trick is possible with a loop of string. However, the effect looks better and is easier with a ball-chain. The effect is that the loop is put over the first and secund fingers of the left hand and although these fingers are held by a spectator, the loop comes free.METHOD:1. Slip the ball-chain over the first and middle fingers of the left hand and stretch the cain as in Figure 1.2. Bend the left thumb inwards, so that the tip touches the spot marked with a cross. (See Figure 2.) 3. Turn the right hand over and at the same time hook the left thumb under the chain, then straighten the tumb (Figure 3). 4. Turn the right hand over again. (Figure 4.) 5. Throw the bight which is formed by the right hand and the chain, over the whole left hand (see arrow in Figure 4 and the result in Figure 5). 6. Let someone from the audience hold your left first and second fingers (crossed in Figure 5). Alternatively you can put the tips of these fingers in your mouth, if you prefer. 7. Warn your helper, that he must under no circumstance release your fingers before the chain is freed. 8. Take hold of the chain at A (Figure 5) and move the chain up. Move the chain about, first release your thumb then the third and little fingers and you’ll find the chain comes free of your hand. That’s all — very effective. The release must be done rather quickly After thoughts: . This trick can be done with any combination of fingers and any number of fingers. |
|
COLOURED WATER PRODUCTIONEFFECT The magician shows three empty glasses and lines them up on the table. He then produces a red handkerchief, shows it clearly on both sides and drapes it over the first glass. Two other handkerchieves are produced, one yellow and one green and draped over the other glasses. A magic pass, and the hankies are removed to show that each glass is now full of liquid coloured to match their covers. REQUIREMENTS Three stemmed glasses three razor blades or sharp pins, three balloons, three silk hankies (one red, one yellow, one green), appropriate food colouring, nylon thread. PREPARATION Some sort of balloon-bursting device has to be fixed into the bottom of each of the glasses. I have found that razor blades are quite effective, stuck in place (sharp edge up, of course) with an all purpose glue, but anything that will burst the balloons will do. Drawing pins woud be easier to glue in place, but they woud have to be verry sharp in order to do the job.
|
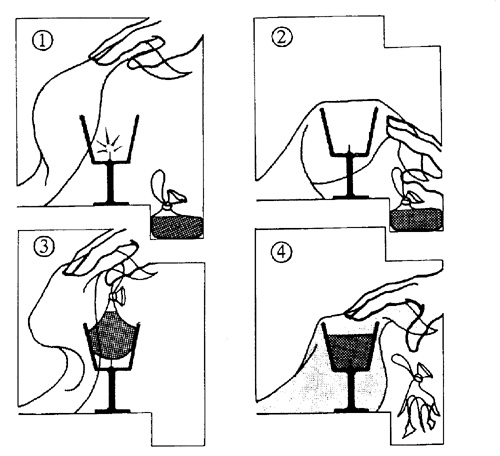 |
| PRESENTATION
The handkerchieves can be either just picked up from the table or, preferably, produced “by magic” using a suitable method. Each one is draped over the appropiate glass (make sure you get the colours right) which sits near the back of the table in front of its load, as in the diagrams. |
|
[:de]Zaubererschule:
| TÜCHLEIN… du mußt wandernFür dieses faszinierende Kunststück benötigst du: – 2 Tüchlein 20×20 cm – 1 Taschentuch 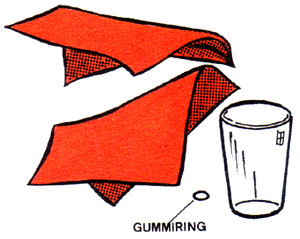 – 1 kleinen Gummiring – 1 Glas 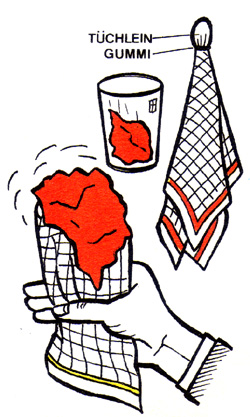 Zuerst knüllst du ein rotes Tüchlein ganz klein zusammen, legst es in die Mitte des Taschentuches und ziehst den Gummiring darüber. So vorbereitet, steckst du es in deine Jackentasche. Zuerst knüllst du ein rotes Tüchlein ganz klein zusammen, legst es in die Mitte des Taschentuches und ziehst den Gummiring darüber. So vorbereitet, steckst du es in deine Jackentasche.Zeige das Glasundstecke das-zweite-rote Tüchlein hinein. Hole das Taschentuch aus deiner Jackentasche, ergreífe es in der Mitte und stecke diesen Mittelteil, in dem sich das zweite rote Tüchlein befindet, zu dem im Glas befindlichen roten Tuch. Die vier Ecken des Taschentuches hängen über das Glas. Nimm diese an der Unterseite des Glases zusammen und ziehe daran. So erscheint aus dem Taschentuch das kleine rote Tuch. Der Gummiring fällt in das Glas. Stecke dieses rote Tuch in deine Tasche. Mache eine Wurfbewegung Richtung Glas, laß einen Zuschauer das Taschentuch vom Glas wegnehmen, und siehe da, das Tuch ist im Glas gelandet. EIN ZAUBERTUCH STELLT ALLE NATURGESETZE AUF DEN KOPF!Du steckst in ein Wasserglas ein rotes Tüchlein, ungefähr 20×20 cm groß, bedeckst das Glas mit einem Taschentuch, und -o Wunder!das kleine rote Tuch wandert durch das Taschentuch aus dem Glas heraus. Du steckst das rote Tuch ein und wirfst es scheinbar in das Glas zurück. Der Zuschauer entfernt das Taschentuch-das rote Tüchlein ist tatsächlich im Glas! |
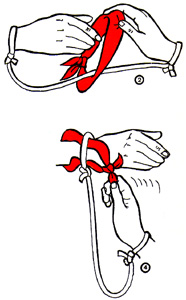
| DAS TUCH DER GEISTER
EIN KUNSTSTÜCK MIT GEFESSELTEN HÄNDEN! Du läBt dir von einem Zuseher mit einer Schnur die Hände binden. Auf diese Schnur bindet ein zweiter Zuseher ein farbiges kleines Tuch. Du wendest dich kurz ab, und schon hast du das Tuch befreit, ohne den Knoten zu öffnen. Nach erneutem Abwenden befindet sich das Tuch wieder auf der Schnur-die Zuschauer können alles untersuchen. So wird’s gemacht: Die Schnur soll ca. 1 m lang sein. Nachdem sich das Tuch auf der Schnur befindet (Abb. 1) und du dich abgewendet hast, brauchst du die Schlinge des Tuches nur über deine Hand zu ziehen (Abb.2,3) und von dort mit der anderen Hand unter der über dem Handgelenk locker zusammengebundenen Schnur Richtung Finger herunterzunehmen (Abb.4). Beim Zurückgeben machst du es genau umgekehrt. |
 |
| KARTEN-EXPERIMENT
DIE MAGISCHE ZAHL 21 Für dieses verblüffende Kunststück benötigst du: 1 Kartenspicl Ferner mußt du wissen, daß die gegenüberliegende Punktezahl eines Würfels immer 7 ergibt. |
| JOKER- VERWANDLUNG | |
 |
WIE AUS EINER GEWÖHNLICHEN SPIELKARTE EIN JOKER WIRD!
Der Zuschauer sieht in deiner Hand drei Karten: in der Mitte eine rote Zahlenkarte und links und rechts je eine schwarze Bildkarte. Er möge sich die mittlere merken. Du legst sie auf d~n T~sch, aber, welch eine Überraschung: Wenn der Zuschauer die Karte aufnimmt, hat sich diese in einen Joker verwandelt. Du benötigst: Dic rote Bildkarte schneidest du in der Mitte schräg durch (Abb. 1), den restlichen linken Teil der Karte klebe auf cine schwarze Zahlenkarte, so daß der Klebestreifen innen licgt (Abb. 2). Die halbe Karte kannst du jetzt auf- und zuklappen. Schneide den vorstehenden Teil am unteren Rand weg, so daß die Karte von der Rückseite wie eine aussieht. Stecke in diese entstandene Tasche den Joker, und lege die zweite Zahlenkarte darüber (Abb. 3). Man sieht nun außen zwei. schwarze Zahlenkarten, in der Mitte eine rote Bildkarte (Ahb. 4). So vorbereitet, hältst du die Karten in der linken Hand und bittest einen Zuschauer, er möge sich die mittlere Karte merken. Du wendest die Hand mit den Karten Bitd nach unten, ziehst mit der rechten l Iand die mittlere Karte heraus und legst sie Bild nach unten auf den Tisch (Abb. 5). Bevor du die verblicbenen Karten in deiner Hand herzeigst, schicbe sie etwas zusammen, werfe selbst einen kurzen Blick darauf, ob die angcklebte halbe Karte gut verdeckt ist. Halte sie dann offen zum Publikum. Du läßt den Zuschaucr den Wert der Karte nennen und ihn selbst die am Tisch liegende Karte umdrehen. Alle werden erstaunt sein, denn die Bildkarte hat sich in einen Joker verwandelt. |
[:]